
git을 사용하고는 있지만 그때그때 필요한 기능만 사용하다 보니 모르는 명령어 또는 제대로 알고 사용하고 있지 않은 명령어가 있다는 생각이 들었습니다. 보통 업무를 할 때는 툴을 통해서 많이 작업하다 보니 특히 그랬던 것 같은데 이번 기회에 공부할 겸 정리를 한번 해봤습니다.
설정
git에 관련된 설정은 git config를 통해서 확인하고 설정할 수 있습니다.
> git config --list            # git 설정 조회
> git config --global -e       # git 설정 편집
사용자 정보
git에서 작업 내용을 확인 시 작업자 정보를 확인할 수 있도록 사용자 정보를 설정합니다.
# 사용자 정보 조회
> git config user.name
> git config user.email

# 사용자 설정
> git config --global user.name "홍길동"
> git config --global user.email "gildong.hong@example.com"
autocrlf
윈도우는 줄 바꿀시 carriage-return과 line feed가 적용된 (\r\n)으로 처리하고 맥에서 줄 바꿈은 line feed(\n)로 적용하기 커밋 내역 비교 시 문제가 될 수 있습니다. 이런 문제를 해소하기 위해서 autocrlf를 설정합니다.
> git config --global core.autocrlf true   	# 윈도우
> git config --global core.autocrlf input		# 맥
Git 구조
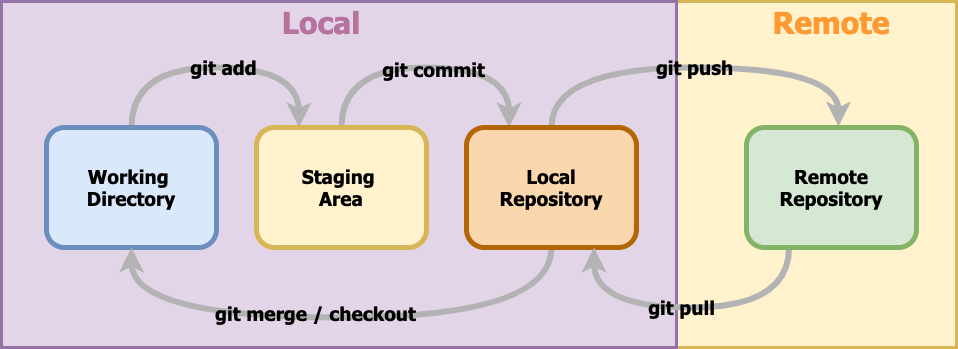
Working Directory
프로젝트의 파일이 있는 영역으로 untracked와 tracked로 구분됩니다. untracked는 git에 아직 추가되지 않은 (신규)파일이고, tracked는 git에 추가되어 트래킹 대상 파일입니다. tracked는수정 여부에 따라서 다시 unmodified, modified로 나뉩니다. unmodified 파일은 수정된 내용이 없는 상태이고, modified은 수정된 파일을 의미하며 modified만 staging area으로 옮겨갈 수 있습니다.
Staging Area
작업 진행 중 commit할 준비가 되어 있는 파일들을 옮겨두는 영역입니다. working dirctory에서 자유롭게 작업하고 commit할 대상만 선택적으로 옮겨둘 수 있습니다.
Local Repository
로컬에서 버전 히스토리를 저장하는 영역입니다.
Remote Repository
원격 서버에서 버전 관리하는 영역입니다. 로컬에서만 버전 관리하다가 혹시 모를 사고로 유실될 가능성도 대비하고 다른 사람과 함께 작업을 하기 위해 사용하는 영역입니다.
Git 명령어
git init
로컬 작업 경로에서 git init 명령어를 입력하면 local repository가 생성됩니다
> git init
> ls -altr 	# 숨겨져 있는.git 디렉토리 확인
새로운 파일 2개를 만들어 보겠습니다.
> echo hello > a.txt
> echo world > b.txt
git status
git status 명령어를 이용하면 git의 상태를 확인할 수 있습니다. 생성한 파일 2개 모두 untracked 상태인 것을 알 수 있습니다.
On branch master

No commits yet

Untracked files:
  (use "git add <file>..." to include in what will be committed)
	a.txt
	b.txt

nothing added to commit but untracked files present (use "git add" to track)
git add
untracked 상태 파일을 git이 트래킹할 수 있도록 staging area로 옮길 때 사용하는 명령어입니다.
> git add a.txt
> git status
On branch master

No commits yet

Changes to be committed:
  (use "git rm --cached <file>..." to unstage)
	new file:   a.txt

Untracked files:
  (use "git add <file>..." to include in what will be committed)
	b.txt
이번에는 a.txt에 내용을 수정하고 확인해보면 modified 상태인 것을 확인할 수 있습니다.
> echo add >> a.txt
> git status
On branch master

No commits yet

Changes to be committed:
  (use "git rm --cached <file>..." to unstage)
	new file:   a.txt

Changes not staged for commit:
  (use "git add <file>..." to update what will be committed)
  (use "git restore <file>..." to discard changes in working directory)
	modified:   a.txt

Untracked files:
  (use "git add <file>..." to include in what will be committed)
	b.txt
unstage하고 싶을 때는 git rm --cached <file>... 명령어를 사용하고 working directory에 있는 변경사항을 삭제하려면 git restore <file>...을 사용합니다.
untracked 파일을 삭제하고 싶은 경우에는 git clean을 이용합니다.
> git clean -fd
git diff
변경된 내용에 대해서 확인할 때 사용합니다. git diff라고 하면 working directory에 있는 내용과 staging area에 있는 내용을 비교합니다.
> git diff a.txt
diff --git a/a.txt b/a.txt
index ce01362..dff93d4 100644
--- a/a.txt
+++ b/a.txt
@@ -1 +1,2 @@
 hello
+add
--staged 옵션을 이용하면 staging area에 있는 a.txt와 local repository에 있는 내용을 비교할 수 있다.
> git diff --staged a.txt
diff --git a/a.txt b/a.txt
new file mode 100644
index 0000000..ce01362
--- /dev/null
+++ b/a.txt
@@ -0,0 +1 @@
+hello
커밋과 브랜치 별로 비교할 수도 있습니다.
> git diff <branch1>..<branch2>
> git diff <commit1>..<commit2>
git commit
staging area에 있는 변경 내용을 local reposiotry에 저장할 때 사용합니다.
> git commit
commit 명령어를 실행하면 편집창이 나타나는데 보통은 첫번째 줄에 commit 제목, 그 아래에 상세 설명을 작성합니다.
commit 내용

commit 설명
# Please enter the commit message for your changes. Lines starting
# with '#' will be ignored, and an empty message aborts the commit.
#
# On branch master
#
# Initial commit
#
# Changes to be committed:
#       new file:   a.txt
#
# Changes not staged for commit:
#       modified:   a.txt
#
# Untracked files:
#       b.txt
#
commit 메시지를 좀 더 간단하게 처리하고 싶을 때는 -m 옵션을 사용할 수 있습니다.
> git commit -m "커밋 메시지"
working directory와 staging area에 있는 모든 내용을 commit 할 때는 -a옵션을 사용하면 됩니다.
> git commit -am "커밋 메시지"
amend
이미 commit한 메시지를 수정하고 싶은 경우
> git commit --amend -m "새로운 커밋 메시지"
최신 commit에 staging area에 있는 내용을 추가 적용하고 싶을 때
> git commit --amend
amend를 사용해서 commit을 변경하게 되면 새로운 해시코드로 commit id가 만들어지기 때문에 이미 origin에 있는 commit일 경우에는 사용하지 않는 것이 좋습니다.
git log
commit 로그를 확인할 때 사용합니다.
> git log -5											# 최근 5개만 조회
> git log --online -5							# 한줄로 최근 5개만 조회
> git log --author="저자"			 		 # author로 검색
> git log --before="2021-05-09"   # 특정 날짜 이전으로 검색
> git log --grep="text"    				# commit 내용중에 "text"가 들어간 데이터 검색
> git log -S "text" -p       			# commit 소스 컨텐츠 중에서 "text"문자가 들어간 commit 검색
git hist
git log를 alias 등록해서 사용하면 좀 더 편리하게 사용할 수 있습니다. 참고
git config --global alias.hist "log --pretty=format:'%C(yellow)[%ad]%C(reset) %C(green)[%h]%C(reset) | %C(red)%s %C(bold red)%C(reset) %C(blue)%d%C(reset)' --graph --date=short"
git reflog
이전 HEAD 내용들을 기억하고 있어서. 원하는 시점으로 되돌아 갈 수 있습니다.
> git reflog
> git reset --hard <해시코드>
git reset
특정 commit으로 초기화 시켜주는 명령어입니다.
> git reset HEAD~1 # HEAD 이전으로 reset
mixed
default 옵션. --mixed 옵션은 히스토리는 삭제하지만 작업한 파일은 working directory로 이동합니다.
soft
--sort 옵션을 적용하면 작업한 파일은 working directory가 아니라 staging area 영역으로 이동합니다.
> git reset --soft HEAD~2
hard
--hard는 작업했던 파일을 그냥 완전히 지울 때 사용합니다.
> git reset --hard HEAD # 로컬에서 작업하던 모든 파일이 삭제됨
git push
Local repository에서 작업한 내용을 remote 저장소에 적용할 때 사용합니다.
>  git remote add <name> <url>							# 원격 저장소가 설정되어 있지 않은 경우
>  git push --set-upstream <name> <branch>	# upstream 브랜치 se설정
tracking
현재 local 브랜치가 어떤 remote 브랜치를 tracking 하고 있는지 확인할 수 있습니다.
> git status -sb
git branch
브랜치 생성/조회/수정/삭제 등을 할 수 있습니다.
> git branch      										# 로컬에 있는 브랜치 조회
> git branch --all 										# 원격 포함 전체 조회
> git branch feature1   							# 새로운 브랜치 생성
> git branch feature1 origin/master		# origin/master로 부터 브랜치 생성
> git branch --move feature1 feature2 # 브랜치 이름 변경
> git branch -d <브랜치이름>							# 브랜치 삭제
git merge
현재 브랜치에 다른 브랜치를 merge 할 때는 사용하는 명령어입니다.
> git merge feature1
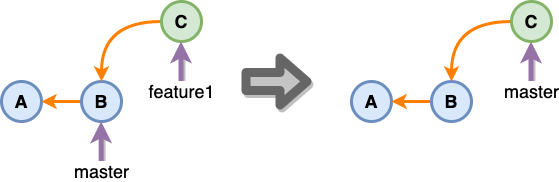
fast forward merge
기준 브랜치에서 새로 생성한 브랜치를 생성하고 이후에 추가된 commit이 없다면 제일 깔끔하게 머지 하는 방법. 너무 깔끔한 나머지 브랜치에 merge가 되었다는 기록조차 남지 않는다.
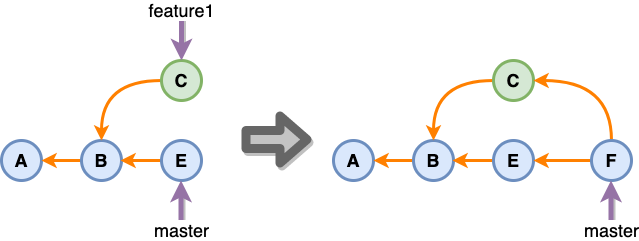
3-way merge
feature 브랜치와 master 브랜치가 합쳐진 merge commit이 만들어진 형태입니다. merge한 기록이 남습니다.
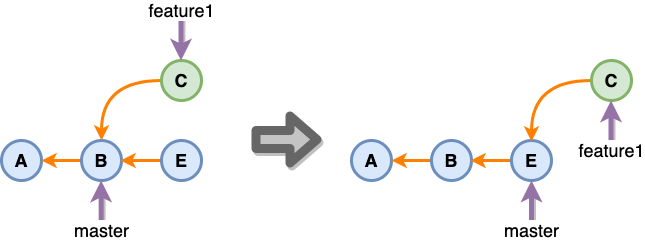
git rebase
3-way merge를 하게 되면 히스토리에 새로운 merge commit이 생기게 됩니다. 만약 이게 싫다면 위 이미지 기준으로 master를 rebase하고 merge하면 fast forward merge로 처리할 수 있습니다.
> git switch feature1
> git rebase master
> git switch master
> git merge feature1
하지만 조심해야 할 게 있는데 feature 브랜치에서 혼자 작업하고 있다면 상관없지만 여러 명이 함께 작업하고 있다면 rebase를 하게 되면 기존 commit을 유지하는 게 아니라서 새로운 commit이 생성되기 때문에 다른 개발자들과 함께 작업하고 있는 브랜치라면 사용하지 않는 것이 좋습니다.
onto
브랜치에서 브랜치를 계속 생성해서 작업하는 경우에 특정 브랜치만 따로 적용되어야 하는 경우가 있을 있습니다. 이럴 경우에는 rebase --onto를 사용하면 쉽게 해결할 수 있습니다.
이것도 역시 다른 개발자와 함께 사용하는 브랜치고 이미 서버에 올라가 있다면 commit 정보가 변경되기 때문에 조심할 필요가 있습니다.
> git rebase --onto master feature1 feature1-1
> git switch master
> git merge feature1-1

commit 분할
commit한 내용을 분할하고 싶을 경우에도 rebase를 이용할 수 있습니다.
> git rebase -i <commit> # commit id는 분할하려고 하는 커밋의 이전으로 설정
위 명령어를 입력하고 나면 아래와 같은 편집창이 나오고 나눌려고 하는데 commit을 pick에서 e또는 edit로 변경합니다.
pick 585c3cd add and modify
pick bd003b9 delete

# Rebase 7cd6a02..bd003b9 onto 7cd6a02 (2 commands)
#
# Commands:
# p, pick <commit> = use commit
# r, reword <commit> = use commit, but edit the commit message
# e, edit <commit> = use commit, but stop for amending
# s, squash <commit> = use commit, but meld into previous commit
# f, fixup <commit> = like "squash", but discard this commit's log message
# x, exec <command> = run command (the rest of the line) using shell
# b, break = stop here (continue rebase later with 'git rebase --continue')
# d, drop <commit> = remove commit
# l, label <label> = label current HEAD with a name
# t, reset <label> = reset HEAD to a label
# m, merge [-C <commit> | -c <commit>] <label> [# <oneline>]
# .       create a merge commit using the original merge commit's
# .       message (or the oneline, if no original merge commit was
# .       specified). Use -c <commit> to reword the commit message.
#
# These lines can be re-ordered; they are executed from top to bottom.
#
# If you remove a line here THAT COMMIT WILL BE LOST.
#
# However, if you remove everything, the rebase will be aborted.
이제 commit을 분할하기 위해서 원하는 위치로 reset 합니다.
> git reset <commit> # commit id는 분할하려고 하는 커밋의 이전으로 설정
reset을 통해서 working directory로 이동한 파일을 각각 분할해서 commit 하고 rebase를 계속 진행합니다.
> git rebase --continue
이제 로그를 확인해보면 commit이 분할되어 생성된 것을 확인할 수 있습니다.
squash
여러 commit을 하나의 commit으로 합치고 싶은 경우에 사용합니다. commit을 분할할 때와 동일하게 rebase를 먼저 실행합니다.
> git rebase -i <commit> # commit id는 분할하려고 하는 커밋의 이전으로 설정
합칠려고 하는 commit의 첫번째는 pick로 하고 나머지는 squash(s)로 변경하고 저장합니다.
pick 835ab40 modify a.txt
s d7a4db6 add b.txt
s b9012d4 delete

# Rebase 7cd6a02..b9012d4 onto 7cd6a02 (3 commands)
#
# Commands:
# p, pick <commit> = use commit
# r, reword <commit> = use commit, but edit the commit message
# e, edit <commit> = use commit, but stop for amending
# s, squash <commit> = use commit, but meld into previous commit
# f, fixup <commit> = like "squash", but discard this commit's log message
# x, exec <command> = run command (the rest of the line) using shell
# b, break = stop here (continue rebase later with 'git rebase --continue')
# d, drop <commit> = remove commit
# l, label <label> = label current HEAD with a name
# t, reset <label> = reset HEAD to a label
# m, merge [-C <commit> | -c <commit>] <label> [# <oneline>]
# .       create a merge commit using the original merge commit's
# .       message (or the oneline, if no original merge commit was
# .       specified). Use -c <commit> to reword the commit message.
#
# These lines can be re-ordered; they are executed from top to bottom.
#
# If you remove a line here THAT COMMIT WILL BE LOST.
#
# However, if you remove everything, the rebase will be aborted.
squash 되고 나면 commit 메시지를 입력하는 화면이 나오는데 새로운 commit 메시지를 입력하고 저장하면 하나로 합쳐진 것을 확인할 수 있습니다.
git revert
앞서 확인했던 reset, rebase 모두 다른 사람과 함께 작업하는 브랜치이고 이미 remote에 반영된 내용이라면 사용하면 안 됩니다. 새로운 commit id가 생성되기 때문에 다른 사람과 병합하는 과정에서 문제가 생길 수 있기 때문입니다.
이미 remote에 반영된 내용을 되돌리고 싶은 경우에는 revert를 사용합니다. revert를 하면 예전으로 되돌리는 새로운 commit이 생성됩니다.
> git revert <commmit>
git tag
commit이 많아지고 히스토리가 많아지게 되면 어느 특정한 시점으로 돌아가기가 힘들 수 있습니다. 이런 경우를 위해서 특정 commit 을 북마크 하고 싶을 때 사용할 수 있습니다.
> git tag <태그>
> git tag <태그> <commit> # 특정 커밋에 태그 적용
git fetch
remote에 변경사항을 받아옵니다.
> git fetch
git pull
remote에 변경사항을 받아오고 merge 합니다.
> git pull
git cherry-pick🍒
특정 commit을 현재 브랜치에 가져올 때 사용합니다.
> git cherry-pick <가져올커밋코드>
git stash
작업 내용을 잠시 별도의 공간에 저장하기 위해 사용합니다. 다른 작업을 진행해야 하거나 다른 브랜치 내용을 확인하기 위해서 이동해야 할 때 유용하게 사용할 수 있습니다.
> git stash
> git stash -m "first"								# 메시지와 함께 stash 추가
> git stash -m "first" --keep-index		# staging area에 있는 내용은 제외

> git stash -u 			# untracking 파일도 추가하고 싶은 경우

> git stash list 							# stash  내용 조회
> git stash show <stash id>		# stash  상세 조회

> git stash apply <stash id>	# 옮겨오는만 할 경우
> git stash pop <stash id>		# 옮겨오면서 목에서는 삭제함
> git stash drop <stash id>		# stash 삭제
> git stash clear							# stash 전체 삭제
마무리
지금까지 git의 기본 설정, 구조, 명령어 대해서 확인해 봤습니다. 빠진 내용도 있지만 이 정도만 알고 있어도 실제 업무 진행에는 어려움이 없을 것이라 생각됩니다.
끝.
댓글남기기